



Catheter Tip Forming Process | Expert Guide to atraumatic Tips


Mastering the catheter tip forming process is essential for creating high-performance, atraumatic medical devices. This precise manufacturing step shapes the distal end of a catheter, ensuring it can safely navigate complex anatomy without causing vessel damage. From RF welding to thermal forming, the chosen method directly impacts the device's trackability, safety, and clinical success.
What is the Catheter Tip Forming Process?
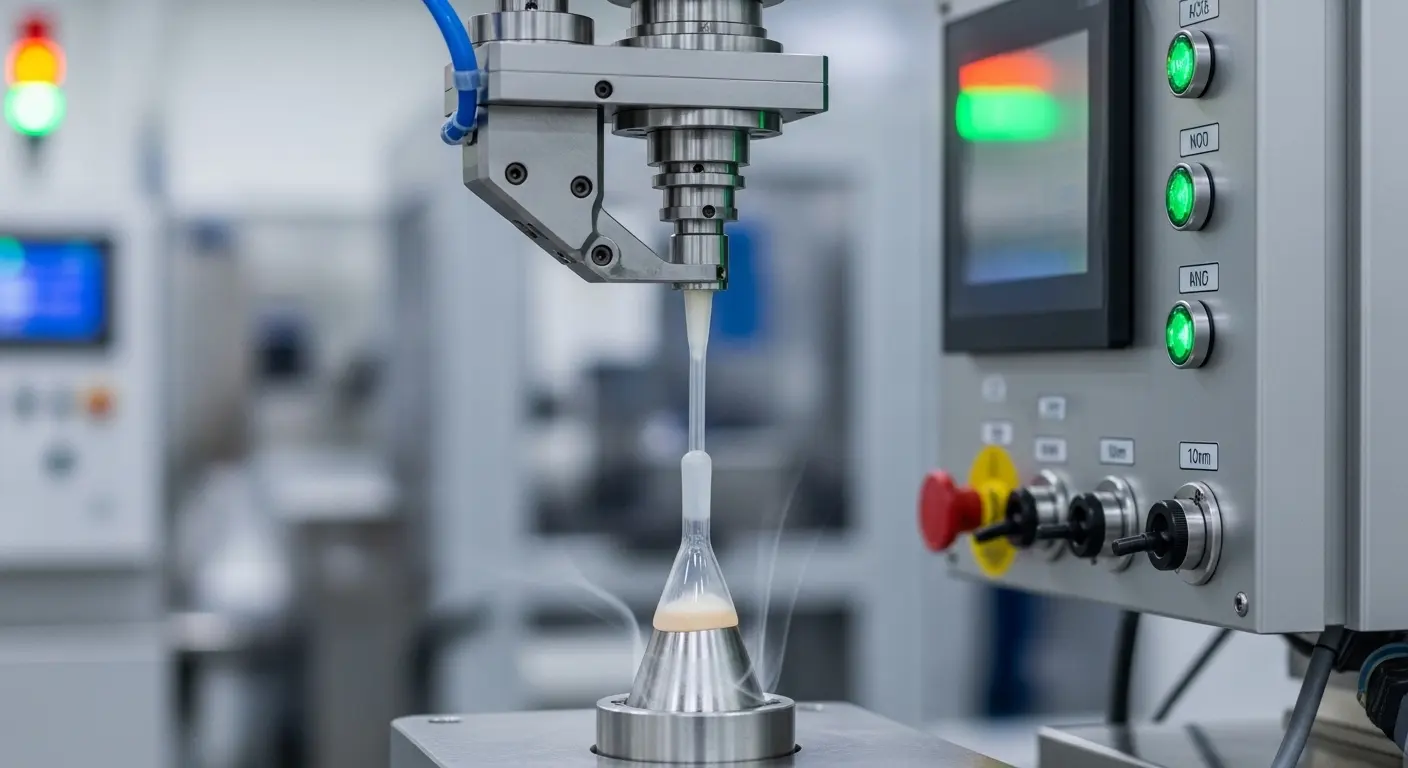
The catheter tip forming process is a specialized manufacturing technique used to shape the distal end of a catheter tube. This process typically involves applying heat (via RF, induction, or hot air) and pressure to soften the thermoplastic material, molding it into a specific geometry, such as a tapered, rounded, or beveled tip. The goal is to create a smooth, flash-free finish that minimizes tissue trauma during insertion and navigation.
In my experience on the manufacturing floor, the difference between a good tip and a great tip often comes down to tenths of a second in the heating cycle. If the material overheats, it degrades; if it underheats, the tip won't form completely, leaving a sharp edge. Precision is everything. This process ensures that devices like a malecot catheter or a sophisticated steerable catheter can do their job safely.
Key Objectives of Tipping
- Patient Safety: Eliminate sharp edges that could cause vessel dissection or perforation.
- Trackability: A tapered tip allows the catheter to follow a guide wire smoothly through tortuous anatomy.
- Device Compatibility: Ensures smooth transition when other devices (like stents or balloons) pass through the catheter lumen, much like how a medical hypodermic syringe hub must perfectly match its needle.
- Aesthetics: A clean, flash-free finish indicates manufacturing quality.
Which Heating Technologies are Used for Catheter Tipping?
The common heating technologies used for the catheter tip forming process include Radio Frequency (RF), Induction, Infrared (IR), and Hot Air. RF heating is favored for its speed and precision, offering localized heat. Induction heating works well with braided catheters, heating the metal braid directly. Hot air is versatile and often used for simple tipping or bonding operations.
Each technology has its strengths. RF tipping, for instance, uses an electromagnetic field to agitate molecules in the plastic, heating it from the inside out very rapidly. This is perfect for high-volume production of standard polyurethane or Pebax catheters.
| Technology | Heating Method | Primary Benefit | Best Application |
| RF (Radio Frequency) | Dielectric heating | Extremely fast cycle times, highly localized. | Non-braided thermoplastics (e.g., PICCs, CVCs). |
| Induction | Magnetic field | Heats metal parts directly; precise control. | Braided catheters, bonding metal markers. |
| Hot Air | Convection | Simple set-up, versatile for different shapes. | Low-volume production, bonding balloons, or specialized tips. |
| Infrared (IR) | Radiant energy | Non-contact heating, good for sensitive materials. | Coating curing, some tipping. |
What are the Main Steps in the Thermal Tipping Process?
The thermal catheter tip forming process typically involves three main steps: loading, heating/forming, and cooling. First, the operator places the catheter tube and a mandrel (which maintains the lumen ID) into the tipping mold. Next, heat is applied while the tube is pushed into the mold cavity, causing the material to flow and take the mold's shape. Finally, the tip is cooled (often with air or water) before being removed from the mold.
Detailed Breakdown of Steps
- Loading: This step requires absolute cleanliness. Any dust on the mandrel or inside the mold will embed itself into the catheter tip, causing a defect.
- Heating and Forming: This is where the magic happens. The mold profile dictates the final shape. Whether it’s a simple taper or a complex curve for a neurovascular device, the plastic must flow evenly. I’ve seen production yields improve significantly just by optimizing the "soak time"—the brief moment the material sits at peak temperature before cooling.
- Cooling and Extraction: Cooling sets the shape. If extracted too hot, the tip can deform. Once cool, the operator removes the mandrel. It's crucial that the lumen remains perfectly clear and true to size.
What Challenges Occur During Catheter Tipping?
Common challenges during the catheter tip forming process include flash formation, tip eccentricity (off-center lumen), material degradation, and mandrel stuck in the tip. Flash, or excess material, occurs if the mold isn't sealed correctly. Eccentricity happens if the tube and mandrel aren't perfectly aligned. Degradation results from overheating, while a stuck mandrel often indicates insufficient cooling or lack of lubrication.
In my time trouble-shooting tipping lines, the "stuck mandrel" was the most frequent headache. Operators would try to pull it out too quickly, sometimes stretching or snapping the tip. We found that a micro-layer of medical-grade silicone lubricant on the mandrel was often all it took to solve the problem. It highlights that success is as much about process details as it is about the machinery.
How Does Material Selection Impact Tip Forming?
Material selection is paramount in the catheter tip forming process, as different thermoplastics exhibit unique melt flow rates and thermal stability. Polyurethane (PU) and Pebax are common choices because they are easy to form and can be "tuned" for stiffness. Polyethylene (PE) is trickier, as it has a narrower processing window and tends to "snap back" if not held in the mold correctly during cooling.
Manufacturers often create "bumper tips" by welding a softer material onto the end of a stiffer catheter shaft. The tipping process then refines this weld into a smooth transition. Knowing the melting points of both materials is critical here; you want to melt the softer tip material completely without degrading the main shaft.
How do Manufacturers Ensure Quality in Tipped Catheters?
Manufacturers ensure quality in tipped catheters through rigorous visual inspection, dimensional measurement, and functional testing. Tips are inspected under magnification (often 10x or more) for flash, voids, or embedded particles. Computerized vision systems measure the taper angle, tip radius, and lumen ID. Functional tests might include trackability testing through a simulated vascular anatomy model.
The visual check is the first line of defense. A burr on a tip is a "never event" in medical manufacturing. I remember one recall caused by tiny voids in the tip that only became apparent under high-stress tracking. Now, many high-end lines include automated tensile testing to confirm the tip won't break off, which is as critical as ensuring sterilization for components like medical cotton swabs.
Common Inspection Parameters
- Visual Inspection: (10x-40x magnification) Check for flash, rough edges, bubbles, and foreign material.
- Dimensional Measurement: Use laser micrometers or vision systems for taper length, tip OD, and lumen ID.
- Tensile Testing: Verify the strength of the formed tip (especially if it’s a welded-on bumper tip).
- Radiopacity: Confirm that any marker bands or radiopaque fillers are properly embedded and visible under X-ray.
What are the Best Practices for Catheter Tipping?
Best practices for the catheter tip forming process include maintaining a perfectly clean environment, using high-precision ground mandrels, optimizing heating and cooling cycles through DOE (Design of Experiments), and validating the process according to FDA/ISO standards. Regularly cleaning tipping molds and verifying temperature accuracy are also vital steps.
Don't underestimate the mandrel. A mandrel with even minor surface imperfections will transfer those flaws to the catheter lumen. Investing in high-quality mandrels and storing them properly pays off. Similarly, understanding "what hospital dressing products are" needed for post-procedure care can sometimes inform the packaging requirements for the sterile catheter kit.
Tipping Optimization Checklist
- Cleanliness: Maintain a Class 10,000 cleanroom.
- Tooling: Use precision molds and burr-free mandrels.
- Parameters: Optimize heat, pressure, and time.
- Verification: Test tips frequently during a production run.
Frequently Asked Questions about Catheter Tipping
Can all thermoplastics be tipped using RF technology?
No, RF technology requires the material to have specific dielectric properties (loss factor). While PU and Pebax are excellent candidates, materials like PTFE (Teflon) or FEP do not respond well to RF and typically require different heating methods.
How do you handle multi-lumen catheters during tipping?
Forming multi-lumen catheter tips is significantly more complex. It requires specialized "multi-pin" mandrels that precisely match each lumen's geometry to prevent them from collapsing or merging during the heating process.
Is the tipping process the same for all catheter sizes?
The basic process is the same, but the tooling and parameters change drastically. Small-diameter neurovascular catheters (often 2F or smaller) require extremely delicate mandrels and much more precise heat control compared to large-bore drainage catheters.
Can the tipping process be automated?
Yes, high-volume production lines often use fully automated tipping systems. These systems load the tube, insert the mandrel, form the tip, cool it, and extract the finished product, improving consistency and reducing labor costs.
Conclusion
The catheter tip forming process is a masterclass in medical device manufacturing, blending materials science with engineering precision. Whether you are producing a simple "as needed" device (like understanding what PRN means in medical terms) or a critical neurovascular catheter, the tip must be perfect. Invest time in process validation, and the result will be a safer, more reliable product.
Submit Your Request
Recent Posts
Tags
- Adult Diapers
- Are custom medical devices safe
- Baby Diapers
- Can respiratory anesthesia be used
- Digital Healthcare
- Do you offer customized consumables
- European Market
- How do you take care of a skin wound
- Industry Trends
- Lady Sanitary Napkins
- Medical Devices
- OEM Medical Devices
- Product Introductions
- Protective Equipment
- Under Pads
- What are custom-made medical devices
- What are diagnostic products
- What are hospital dressing products
- What are medical tube catheters
- What are some common protective equipment
- What are the appropriate applications for hospital dressing products
- What are the appropriate uses for protective equipment
- What is a gynecological examination
- What is a medical consumable
- What is an anesthesia kit
- What is an OEM in medical devices
- what is an wound skin care
- what is can disposable ultrasonic diagnostic
- What is good manufacturing medical devices
- What is hospital-grade protective equipment
- what is medical equipments hospital furniture
- What is medical sterilization wrapping
- What is rehabilitation equipment device
- What medical consumables do you supply
- Where can I find laboratory consumables wholesale
- where can I find medical protection device
- where to buy hypodermic accessories
- where to buy medical apparel
- where to buy medical consumable accessories
- where to find OEM medical device supplier
- where to find rehabilitation equipment supplier
